FREE 2016 I LOVE My Feet DayS! Calendar
You will love your 2016 I LOVE My Feet DayS! Calendar. This 8.5 x 11 13 month calendar provides good foot care tips from December 2015 through December 2016. The 2016 I LOVE My Feet DayS! Calendar includes the dates for all Federal holidays, major religious holidays, important occasions such as election day and feet related trivia. Your free calendar is downloadable so you can print it or use it online. The 2016 I LOVE My Feet DayS! Calendar makes a great gift for the holiday season or a great project for kids. Below are tips to help you personalize your calendar. Limit: 1 calendar per email address.
Tips for Printing and Assembly
Your 2016 I LOVE My Feet DayS! Calendar is formatted to print on 8.5 x11 paper. Printing it in color using cardstock or photo quality paper produces optimum results however, it can also easily be printed in black and white on regular printer paper. Listed below are a few options you can use in assembling your calendar. Adding ribbon or colored rings makes it very decorative and ideal for gift giving. Feel free to experiment with the different options and see which final product you like best.
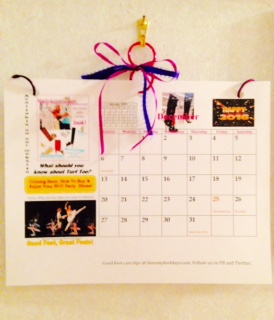
1) Quick and Easy. Assembly time: 5 minutes or less (printing times vary) Supplies needed- 1 Small or Medium Binder clip, glue or strong adhesive tape, approximately 6 inches of ribbon, a picture hanger fastener or thumb tack. Tie the ribbon into a bow. Securely glue or tape it to the binder clip. Print calendar. Put picture hanger/thumb tack, on wall. Gather all printed calendar pages together in order. Put binder clip in the center. Hang calendar by binder clip on picture hanger fastener and enjoy. At the end of each month, move the first page to the back of the calendar or discard.  2) Dual Calendar View. Assembly time: 7 minutes or less Supplies needed: Tape or glue, all supplies listed in #1 Quick and Easy. Using glue or tape, attach the bottom of January to the top of February. Attach the bottom of March to the top of April. Follow the same pattern for all odd month calendars by attaching the bottom of that page to the top of the following even month calendar. Follow all other directions listed in #1 Quick and Easy.
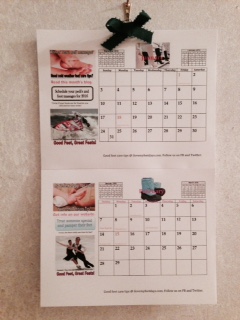
3) Quarterly Calendar View. Assembly time: 7 minutes or less Supplies needed: All of the supplies listed in #2 Dual Calendar View. Using glue or tape, attach the bottom of January to the top of February. Attach the bottom of February to the top of March. Attach the bottom of April to the top of May. Attach the bottom of May to the top of June. Attach the bottom of July to the top of August. Attach the bottom of August to the top of September. Attach the bottom of October to the top of November. Attach the bottom of November to the top of December. Follow all other directions listed in #1 Quick and Easy.
4) Stapled Calendar. Assembly time: 2 minutes or less Supplies needed: Stapler, picture hanger fastener or thumb tack. Gather all the calendar pages together and staple them together ½ from the top of the pages and ½ from each side of pages. Put picture hanger/thumb tack on wall, hang calendar and enjoy. At the end of each month, pull of the page and discard. (If you use cardstock, we recommend you use a heavy duty stapler for better results.)
5) Stapled Duel Calendar View: Assembly time: 7 minutes or less Follow the instructions for #2 Dual Calendar View and staple instead of using the binder clip. Refer to #4 Stapled Calendar. 6) Stapled Quarterly View. Assembly time: 7 minutes or less. Follow the instructions from #3 Quarterly Calendar View and staple instead of using the binder clip. Refer to #4 Stapled Calendar.
7) Ringed Calendar Assembly time: 7 minutes or less Supplies needed: Approximately 1 foot of thin ribbon, string or yarn, 4 small rings, 3 -hole punch, picture hanger fastener or thumb tack. After the calendar prints, punch holes in the top of each page. Make sure you line the pages up so the holes are in the same spot on each page. Put a ring in each of the three holes. Put the last ring in the center ring. Use ribbon to make a bow on the bottom of the fourth ring. Put picture hanger fastener on wall and hang calendar. Enjoy. Foot note: You can use this concept for the Dual and Quarterly Calendar View as well. You can also use the, I LOVE My Feet DayS! Happy 2016 Calendar, cover sheet creatively. You may consider attaching it to the bottom of the last page of your calendar or attaching it separately to the wall above your calendar. Enjoy your calendar and Thank You for your support! 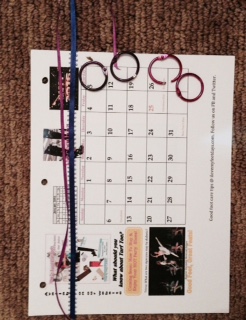


Recent Comments